How to Draw a Horse Portrait with Curly Pencil
In this step by step, Janet Griffin-Scott takes you through the stages of creating a beautiful horse drawing in colored pencil. It starts with the plot, and he works with you by developing a clear tone and texture to create an incredible potential to realize.
Janet made a unique Warmblood Hunters horse for this lesson. With the appropriate color options appropriately, you can change the steps to create a picture of your horse.
Given the diversity of pencil brand colors, Janet isn’t very exact about naming colors. But, of course, colors look different on different screens. So, use whatever seems to be the closest option from your selection of pencils.
Preliminary Sketching
We will start with an initial sketch broken down into basic shapes. This sketch is done in bulk, on lightweight paper, as it will be transferred to drawing paper when complete.
If you draw directly on your 3d drawing paper, you need to draw lightly. We work with colored pencils, and you don’t want to leave too much graphic or hint on paper.
- Notice that the underside of the neck can be obtained from the outside of a curve, i.e., the circle under the horse.
- The eye is an oval, like the nose.
- The shoulder is always a neat circle.
Skeleton of the Head of the Head
When completed, the initial sketch will transfer to the surface. In this case, a Strathmore drawing paper with very little texture was choosing.
Significantly few outlines were adding because the picture is very detailed and easy to work with it. If you’re not confident in drawing the line, following a few essential references can be helpful. Remember that accuracy is critical to the success of realistic drawing.
Drawing the Horse’s Eye
Once your sketch has been transferred, it’s time to start working on the drawing itself. Follow the step and do it step by step, and your horse will begin to take on new life.
- Started the horse face, working in sections divided into bridle parts.
- Start with the eye, as this is the key to getting a good horse resemblance.
- Use shades of brown and black and work well around the eye area.
The Horse’s Eye in Detail
This detail shows up close to the horse’s eye. Notice how the highlights are reserved – left as a white paper – while the strong darks in and around the eye are establishing.
Tip: Unlike the traditional watercolor technique, the black pencil can use effectively in colored pencil drawing.
Laying Colored Pencils
After some work, most of the head completed. It has done using layers and continuously determines the image for color accuracy and the shape and textures of the face.
- The initial layers often follow the form, while the final layers follow the direction of hair growth.
- Blend all colors with a Q-tip but leave darker strokes to suggest individual hair.
- Put bridle and bit details in the initial shades of brown and red.
- The ear interiors are darkened, and shadows are laid on the outer edge.
Drawing a Horse Horse
- The starting layers of yellow and red go down and into the neck, while darker browns use for the neck muscle skeleton.
- Start the neck braids in black, pressing lightly. Again, leave the white areas where the highlights are. The boxes support the course the hair becomes.
- The shadow on the neck is lightly roughed.
Tip: Sometimes, a hard spot on the lead pencil will scratch the surface. Try to minimize it by filling it with other colors of softer leads.
Drawing the Plaited Mane of a Horse
- More braids added. Use the picture to get it accurate regarding how much, the shape, the shadows at the braid base, and the neckline underneath.
- Scrape off any spots of dark color that collect on the raised areas that are multiple layers. Those blips are carefully scraping into an Exacto without disturbing the layers and the surrounding work.
Plait Drawing Detail
It is essential to look at the detail of the neck and mane to show the hair’s texture and make the mark.
The mane hair is pretty shiny – notice the crisp highlights against the tightly drawn darks. On a glossy surface, highlights tend to have sharp edges, while a matte surface will soften the edges.
Always refer to your reference image when drawing highlights – they need to place appropriately. The opinion of highlights and obscurations serves to model the three-dimensional form. Even in minor detail, they all add up to convince the eyes of the realism of the subject. Wrong highlights will make it look ‘somewhat wrong’ even if the viewer can’t identify ‘why.’
Tack Completion
It is where it is essential to know what the equipment looks like. If you don’t get the accuracy right, this is the first thing people will notice when they look at the work.
There is a saying that if you are a writer, write what you know. Also, if you are an artist in any media, you should paint or draw what you know. For this reason, it is worthwhile to spend time and energy researching your topic so that you do not make mistakes.
- The muscles and contours of the shoulder and chest are sketched in, using darker browns and reds.
- A vinyl eraser is critical here in removing areas that are getting excess pigment.
- Use a tissue to blend the significant areas in the neck, then add small strokes to the back to suggest hair and details.
- Add more layers to the bridle, bit, and reins, carefully line drawing in the lacings in the stones.
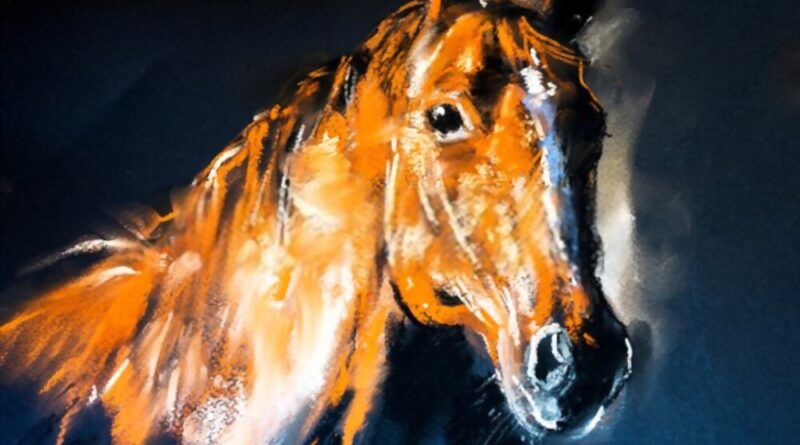
The Complete Portrait Head Photo
Here is the final drawing of the horse, with some details added to the digital magic. I scanned and color corrected the picture, and I placed it on a gradient background using Photoshop.
Some people will call this fraud. I can work with a colored pencil background, but I see no problems using digital tools to my advantage. It is also possible to adjust colors in color, value, and intensity using the software.
It’s an immense pleasure to manipulate the drawing now that it has been done. Experiment and have fun!